Chapter 6: Page modules
In the earlier chapters we saw how to attach page modules with pages. In this chapter we will create a page module to capture quotes from site visitors.
A page module is also known as a frontend module. I may use this term interchangeably. To create a page module you need to extend the Curry_Module class. You can store your class file anywhere inside the cms/include/ path. For better organization we save these files in the cms/include/Project/Module path. Below is a skeleton code for a page module.
<?php

class Project_Module_QuoteRequest extends Curry_Module
{
    public function showFront(Curry_Twig_Template $template = null)
    {
        $r = $this->getRequest();

        // TODO: front end code

        // if a template is attached, render it
        if (null !== $template) {
            return $template->render(array(

            ));
        }
    }

    public function showBack()
    {
        return new Curry_Form_SubForm(array(
            'elements' => array(
                // Zend_Form elements
            ),
        ));
    }

    public function saveBack(Zend_Form_SubForm $form)
    {
        $values = $form->getValues(true);
    }
}
Once again notice the class naming style. That's the way we do it in PSR-1. The code for a page module can be divided into two portions:
- Rendered data.
- Stored data.
The showBack and saveBack methods are identified with "Stored data". You can also call it the "Module Data". This is the data that a backend user sets. For e.g. in an Article module, the backend user can store what text to show in the front end.
The showFront method is identified with "Rendered data". This method will take the stored "module data", do some processing with it and then pass this to the attached Twig template in the form of variables. That is exactly what the $template->render() code does. Twig will then parse the template, produce some meaning HTML and render it to the front end.
It is not mandatory that every page module have a template attached with it. For e.g. we did not attach any template to the Article module. In some cases, when you want to return JSON data, you may not want to attach a template. That's why the argument to the showFront method is optional.
Instead of defining the showFront method, you can define the much easier toTwig() method. The method must simply return an array of variables that must be passed to the attached template.
public function toTwig()
{
  $r = $this->getRequest();

  // TODO: front end code

  return array(
  );
}
The Quotes module
The purpose of this module is to present a form to the site visitor that allows him to enter quote information. We will then save this data to the quote table.
To make this tutorials quick and simple, I will use Curry_Form_ModelForm. By now, you know how "smart" it is. This, however, may not be appropriate in every situation. You may have to manually write HTML for the form in the attached Twig template.
Create a new Twig template in cms/templates/Modules named QuoteRequest.html.twig. I usually give the same name to my attached templates as the module. This makes it easy for me to identify the template and module. Write the following code in the template:
{% if is_saved %}
<p>Quote is saved</p>
{% else %}
{{ form | raw }}
{% endif %}
Is that all? Yes, that is all. That's the beauty of Zend form and Twig. This may not be appropriate in every situation. You may need to configure Zend form decorators or maybe write the form's HTML in the template.
Next, modify the toTwig method in your page module:
public function toTwig()
{
    $r = $this->getRequest();
    $isSaved = false;

    $form = new Curry_Form_ModelForm('Quote', array(
        'withRelations' => array('RecyclingType', 'City'),
        'columnElements' => array(
            'relation__recyclingtype' => array('select', array(
                'multiOptions' => array(null => '[ Select ]') + RecyclingTypeQuery::create()
                    ->orderByName()
                    ->find()
                    ->toKeyValue('PrimaryKey', 'Name'),
                'required' => true,
            )),
            'relation__city' => array('select', array(
                'multiOptions' => array(null => '[ Select ]') + CityQuery::create()
                    ->orderByName()
                    ->find()
                    ->toKeyValue('PrimaryKey', 'Name'),
                'required' => true,
            )),
            'created_at' => false,
            'updated_at' => false,
            'status' => false,
        ),
    ));
    $form->addElement('submit', 'save', array('label' => 'Submit'));

    if ($r->isPost() && $form->isValid($r->post)) {
        $quote = new Quote();
        $form->fillModel($quote);
        $quote->save();
        $isSaved = true;
    }
    return array(
        'form' => $form,
        'is_saved' => $isSaved,
    );
}
Create a new page named QuoteRequest such that the parent and Base page is Demo. Now, attach the QuoteRequest module to the page and test in the front end. You don't have a Quotes backend module as yet to see the quotes. You can see them from the System -> Database module instead.
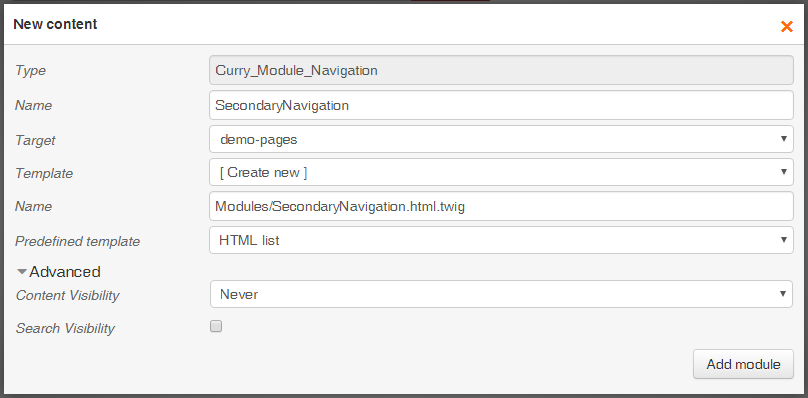
Nice work! while we are still here, let's add a secondary navigation to the Demo pages. In the Demo template page, add another Navigation module named SecondaryNavigation and set the properties according to the image below:
Set the module data as follows:
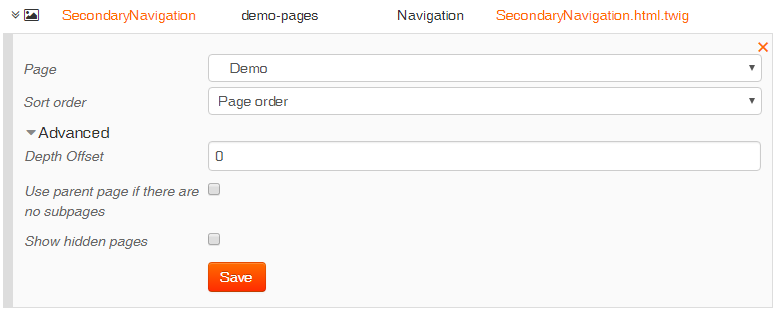
Now refresh the front end and click the Demo link in the navigation. You should see the secondary navigation list showing. If you don't see the list then go to the Properties tab of subpages of Home -> Demo and ensure that Show in menu is checked.
Replace the Twig template code in templates/Modules/SecondaryNavigation.html.twig with this:
{% extends "Modules/Navigation.html.twig" %}

{% block homepage '' %}
We have customized our HTML for the secondary navigation to adhere to the theme style. Add a few quotes via the form and go grab yourself a cup of steaming hot coffee. You deserve it!
In the next chapter we will return to creating a backend module for Quotes and spice up our modules with some cool features.