Chapter 3: Attaching page modules
So far, we have learned to create template pages and apply the layout to other pages. In this chapter we will learn how to attach modules to a page.
If you open the Article.html.twig template, you will notice that we have used a rather strange template tag named placeholder. This tag is not a Twig tag but we have extended Twig to parse such tags specially customized for Curry cms. You can read more about extending Twig here.
The placeholder tag produces the same behavior as {{ var | raw }}.
{% placeholder 'article' %}

{# produces the same behavior as #}

{{ article | raw }}
When you try to attach a module to a page, the placeholder tag will show up in the Target drop-down. Twig variables will not show up in the drop-down. However, this does not prevent you from using a custom Twig variable.
I had mentioned earlier in the series that a module renders a piece of content on a page. We can represent such pieces of content by placeholders and attach modules to those placeholders. Modules then, can render content to those placeholders. They do this by passing data to the attached Twig template which will then render the final HTML content.
MODULE --variables--> Attached Twig template ---> HTML content
Look at the picture below. We have divided content on the page into little pieces which will then be rendered by its own module.
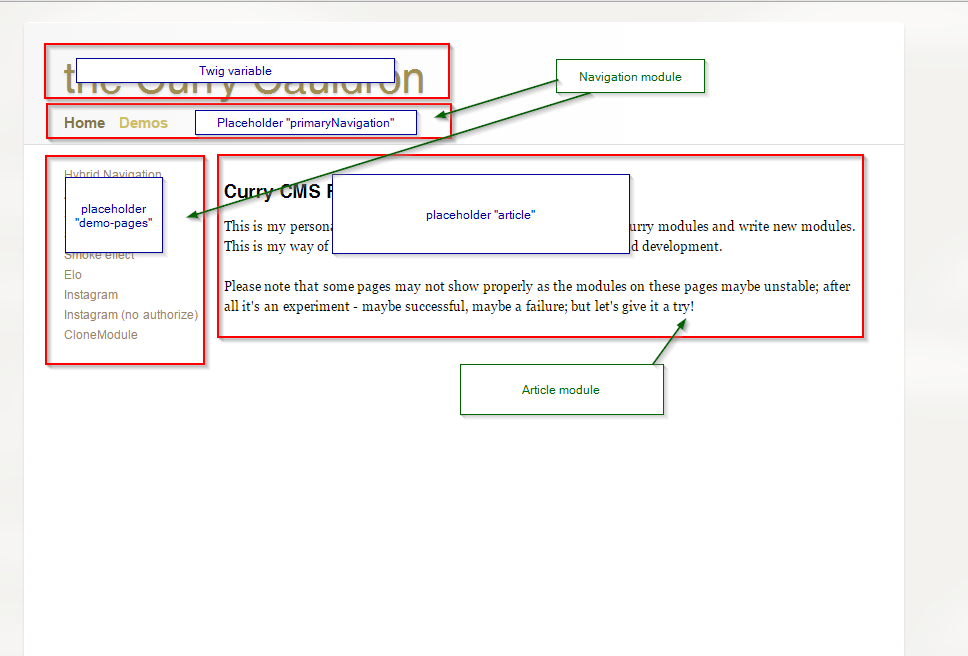
You can attach more than one modules to a placeholder. In this case, the rendered content will depend on the order of modules attached with the page. If a placeholder does not exist on the page's Twig template, that module will not be able to render it's content. If the placeholder exists in more than one places on the page's Twig template, the module's content will be rendered to all those placeholders.
We will now look at some commonly used core modules. There are a whole list of them. Maybe you would like to create some Demo pages and experiment with those modules. We will discuss some commonly used modules.
The Includes module
So far we have not bothered about the css of the page because I wanted you to understand how template inheritance works. Now it's time to attach some css and Javascript to the page. We do this with the Includes module. I will attach the Includes module with the Templates page. That page is the ancestor of all templates and any page inheriting from a child template page will also inherit the Includes module. Besides, if I want to add a new stylesheet in the future, I can do that in one place, i.e. on the Templates page.
- Click the Templates page to select it.
- In the Content tab, click the New content button.
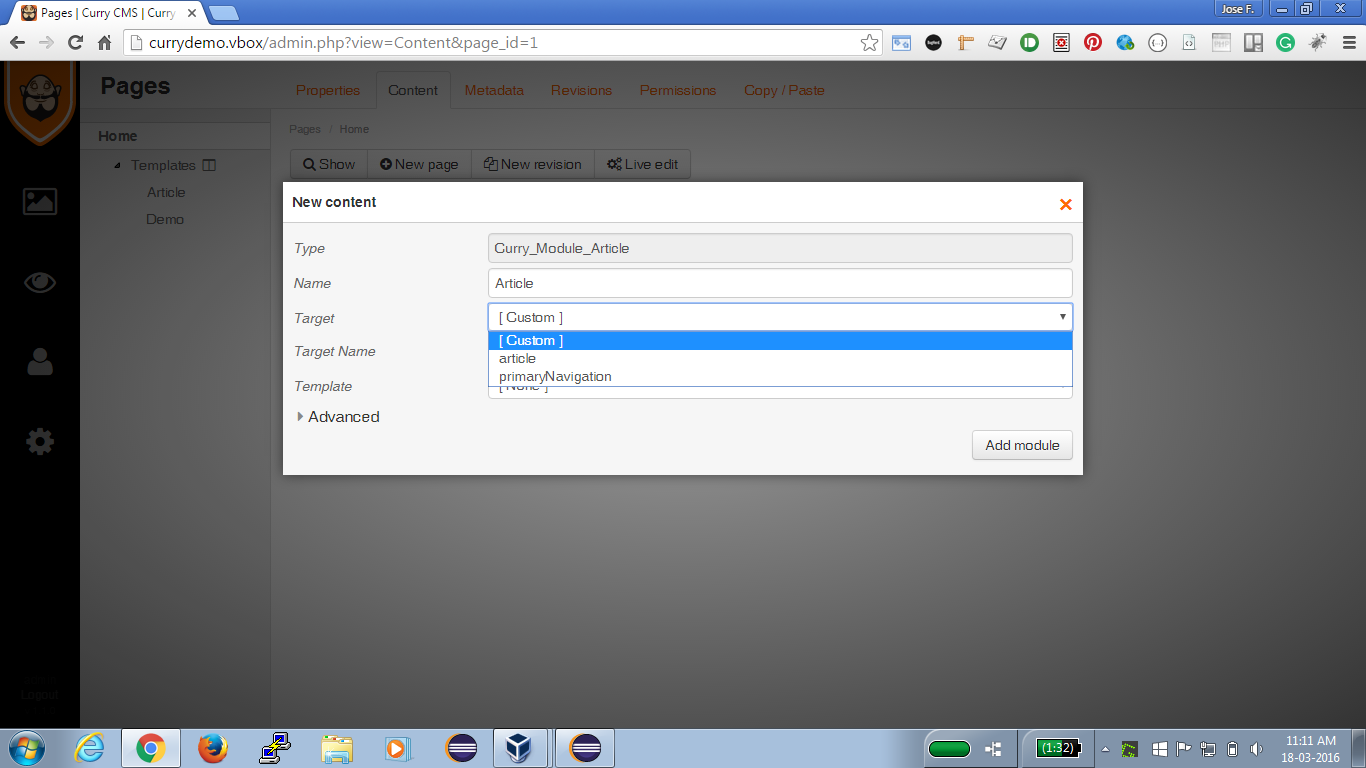
- Click the Type drop-down and select Includes.
- Leave the Target to [ Custom ]
- Type void in the Target Name field.
- Expand Advanced, set Content Visibility to Never. I do this because I don't want a non-admin user to see this module on the page.
- Uncheck Search Visibility. We don't want Curry's search indexer module to index content from this module.
- Click Add module
You will see the module added to the table. Hover over the little icons in the Info column. This will give you some information about the module. I will explain the second icon Page content a little later in this chapter.
Did you notice that we attached the Includes module with a rather peculiar target named void. If you look up the Twig templates, there is no placeholder nor Twig variable named void. This is where you need to dig into the core module's code. You will notice that the module does not care which placeholder it is attached with. It renders its content to the curry.HtmlHead Twig variable. You can find this variable in Base.html.twig in the <head> section. So, you can use any name for the target. It does not matter for the Includes module. It's a rather special module. Generally, when you create modules, you will render content to an existing target.
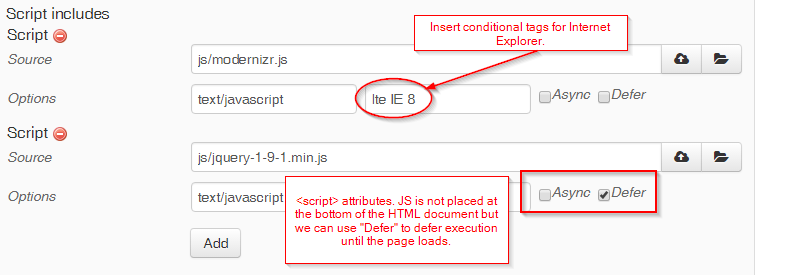
Let's add some stylesheets and Javascripts to the module. Click the name and a dialog will open beneath it. Add the javascripts in the following order:
- js/modernizr.js
- js/jquery-1-9-1.min.js
and the css in the following order:
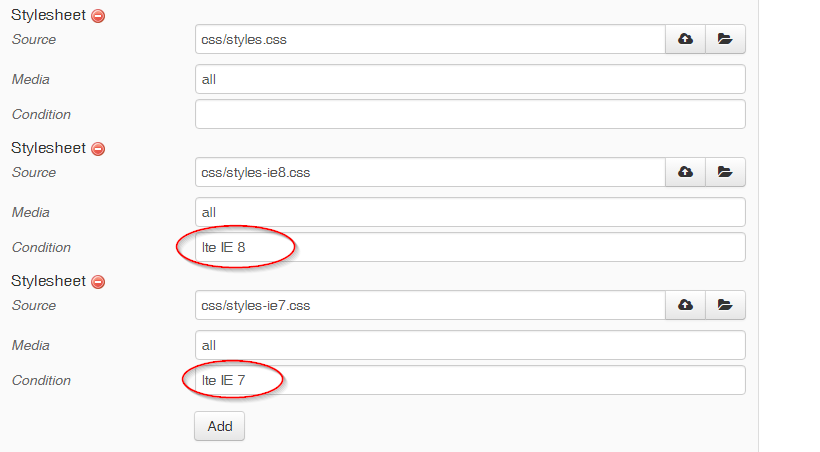
- css/reset.css
- css/vanilla.css
- css/styles.css
- css/styles-ie8.css
- css/styles-ie7.css
This maybe a good time to see the content of the Includes module in the demo project.
You can alter attributes for the script tag and for stylesheets. Curry will automatically construct the conditional tags for Internet Explorer if specified.
Now, if you refresh your Home page you should see the styles applied.
The Navigation module
Another important module that we will use very often is the Navigation module. This module can render a portion of the page tree. It can even be used to generate a sitemap of your site.
Attach the Navigation module to the Templates page to the primary-navigation target. If you do not see the target in the dropdown, set the page template to GenericPage.html.twig. Let's allow this module to create a template for us using one of its predefined templates. In the dialog, set Template to [ Create new ]. The template name can be Modules/Navigation.html.twig. Choose HTML list in the Predefined template dropdown. Set appropriate module visibility settings. Do you want this module indexed? Do you want a non-admin user to play around with this module and mess with your settings?
When you attach this module, notice that a new template is created for you in the templates/Modules folder and attached with the module. Open the template in an editor or from Appearance -> Template and study the code. Maybe you should also see the Php code for the core Navigation module too. You will get an idea of what Twig variables to use.
Let's add another page so that we can see the Navigation module in action. Add another page named Demo as a child page to Home. The Base page must be set to the Demo template page. Leave the other settings to default. Now view the Home page in the front end. You should see the Demo page showing in the navigation bar. Click the Demo page. You will be taken to the /demo url and the navigation will disappear. Let's fix this. Go back to the Navigation module on the Templates page and click the Navigation module name. In the dialog box, select Home from the Page dropdown to set the Root page for the Navigation module. By setting the Root page you inform the Navigation module to render pages relative to the Root. You can configure the depth offset and the direction from the Advanced section.
Now refresh your front end and you should see the navigation showing even for sub pages. The css doesn't seem right now. Copy this code into the Navigation.html.twig template and refresh your page.
{% if page.subpages %}
<nav>
    <ul class="clearfix">
        {% block homepage %}
        <li><a {{curry.page.Url == '/' ? 'class="active"' : ''}} href="/">Home</a></li>
        {% endblock homepage %}
        {% for page in page.subpages %}
        <li><a {{page.IsActiveSubpage?'class="active"':''}} href="{{page.Url}}">{{page.Name}}</a></li>
        {% endfor %}
    </ul>
</nav>
{% endif %}
This should fix the navigation now.
The Article module
This is another module that you may require. It's provides an HTML editor in which you can save and format content. The module also allows you to parse custom Twig variables. We will use this feature when we work with sending email having dynamic content.
For now, attach the Article module with the Templates page at the article placeholder. You could also attach one module with the Article template page and another with the Demo template page. It's a matter of preference to avoid module clutter. For this demo we will attach it with the Templates page. Do not attach a template with this module.
If you attach a template to the Article module, it will pass its data to the content variable which must exist in the attached template. The template is then rendered.
If you do not attach a template then the module will render its content to the placeholder or the target.
Now, "override" the content for the Article module on the Article and Demo template pages. Notice the Info column for the Article module. You should see a Page content icon showing. It is an indicator that the module has "local" content which will be rendered instead of "inherited" content. Go to the front end and see what the Article module renders on the Home and Demo pages.
Nice work! so you have learned how to attach modules to templates and override content.