Chapter 1: Basic project structure
First of all we shall install a simple project. It will then become easy to follow along this documentation. The installed project will contain all code described in this book. Therefore, if you want to follow along, you should keep the demo project as a reference and setup another project as described in the topic Installing Curry CMS.
Setup the demo project
You can follow these steps to install the demo project:
- Clone the project at https://github.com/josedsilva/curry-demo-project.git
- Install dependencies with
php composer.phar install - Create a MySql database named
curry_demo. The collation can beutf8_general_ciorutf8_unicode_ci. Create a database user namedcurrywith all privileges to thecurry_demodatabase. - Create a symbolic link to the Curry core
ln -s vendor/bombayworks/currycms curry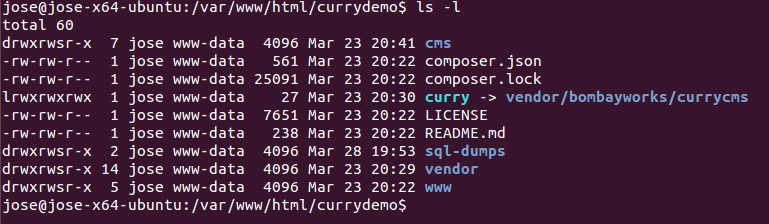
- Import the MySql dump from the
sql-dumpsfolder:mysql -u curry -pdummy curry_demo < sql-dumps/curry-demo-db-dump.sql cd cms/propeland generate your model classes:./propel-gen main.- Either create a virtual host to access the site or start the PHP server from the
www/folder:php -S 0.0.0.0:8080. You should now be able to access the site from your browser. If you are using a virtual machine access usinghttp://[VM IP ADDRESS]:8080. - Log in to the admin interface from
http://[VM IP ADDRESS]:8080/admin.php. Your username is admin and password is admin
I have committed the config/ folder. You should NEVER do that in your projects or else you will end up overwriting live configurations with your development ones when you "pull" repository changes. But, to make it easy for you to follow this tutorial without bothering too much about installation and setup, I have done so.
What is Curry CMS?
Before we start building our demo project, let us study something about the software we are going to work with throughout this series.
Curry CMS is an open source, free to use, object oriented content management system written in Php. It offers a user friendly interface to interact with your application and is developer friendly, allowing the developer to quickly build powerful applications.
It is built with speed in mind. The developer can focus on writing project specific modules without spending time on generic CMS functionality. Custom modules are quick and easy to write which will decrease time to market and development cost.
The core of the CMS is built atop Zend Framework ver 1.x. Twig is the templating engine and the CMS interacts with the database through Propel ORM.
Curry has an easy to use admin interface, commonly known as "the backend". The backend consists of core modules to manage pages, users, roles and permissions, manage the database, configurations and a file browser. You can extend the CMS by creating your own backend modules according to your requirements.
For more information, please visit the Curry CMS website.
Installing Curry CMS
You can install a fresh copy of Curry CMS from Packagist. I recommend you to install the stable version instead of the development version. The development version was broken when this tutorial was being written. To install Curry cms you would execute the following command:
composer create-project --stability=stable bombayworks/currycms-project-base <path>
If you want the latest development version from the 1.x branch then execute:
composer require bombayworks/currycms 1.x-dev
Once you finish installing your new project, you should setup the project structure. Curry CMS follows the PSR-1 coding style guide especially for class names.
Under cms/include create the following directory structure:
Common
|-- Backend
|-- Module
Project
|-- Backend
|-- Module
All Curry CMS contributed packages should be placed in the Common folder and project related packages should placed in the Project folder. I may use the term package and bundle interchangeably.
In Curry CMS, we have two kinds of modules:
- Page module
- Backend module
A module is a self-contained piece of code that does something useful. For e.g. an Article module provides you with a WYSIWYG editor that allows you to write some text and format it by adding paragraph and header styles. It also allows you to store the content so that it can be edited later. It will then render that content to the frontend while preserving your formatting styles.
A page or frontend module is what you will attach to pages which will be responsible for rendering pieces of content on a page - much like Drupal's node and block modules. You can also attach a template with a module to control your formatting. We will explain this in detail later on.
A backend or admin module is a special type of a module that can be accessed from the backend or admin interface only. Generally, you will want to capture and manipulate database data with this kind of a module.
A package is a collection of one or more related backend and frontend modules. For e.g. a Members package can consist of a backend module to list registered users, track information, send email, etc. and the frontend modules can be used to register members, log in, handle forgot passwords, unregister members, etc.
A package can also contain other assets besides modules like schemas, css, js and propel class files etc.
Also, under the www/ folder, you may want to create a folder structure similar to:
css
js
images
|-- site
That structure needs no further explanation and maybe you have been doing something similar all the time.
In Curry, when content is rendered to the frontend, it is manipulated through a template. We use Twig for the templating engine. You have a template for a page layout and for each "block" of content on the page which may be rendered by a module. Hence, you can even attach templates to modules. Therefore, in the cms/templates folder create another folder named Modules. This structure is not mandatory, just a recommendation. It helps you organise templates. If you have a better structure according to the requirements of your project, please go ahead and use that instead.
By default you will see a template named Root.html. That is what we call a base template. It forms the basic structure for page layouts. I will therefore, rename it to Base.html.twig. I prefer to give the .twig extension to Twig templates because my editor knows how to format the syntax. Besides, I dislike living in a Black & White world.
Now we shall setup the page structure. Once again remember that you will need to setup the page structure according to your project requirements. Hover you mouse over the first button in the toolbar on the left hand side and click Pages in the popup. This will take you to the pages module. Remember I mentioned about backend modules earlier? Pages is a core backend module whose class name is Curry_Backend_Page. If you know how to work with PSR-1 coding styles, it should be fairly simple to locate it.
You will need to cultivate the habit of looking up core modules to work your way around.
In the page tree, create a new sub page by clicking the New page button. Name it Templates. Set the Parent page to Home and the Base Page to [Do not inherit]. Uncheck all the visibility settings, i.e. Active, Show in menu, Include in search index. Then, click the Create new page button. Click the Templates page to highlight it in the page tree, then click the Properties tab on your right hand side to open the page properties window. Expand Advanced and set the Page template to Base.html.twig. Then click Save to save your changes.
What you have just done now is create a new page and attach a Twig template to the page. The page will now be able to render the html structure from the attached template. Right click the Show button in the toolbar at the top and open in a new window. Now study the html source. Furthermore, by turning off the visibility settings, you have made this page a layout page. i.e. You can attach modules to this page and apply this page onto other real pages to inherit the layout - much like template pages. That's why I named this page Templates because it will become the ancestor for other template pages. A template page cannot be accessed from the front end except through the admin. Open an incognito window of your browser and paste the url of the frontend that you just opened into the address bar and try to access it. Can you access it or do you get a "Page not found"? That's what I am talking about.
There is one more thing we need to do. In the cms toolbar panel on your left hand side, click The System -> System menu item (the System button has a COG icon). Expand Backend and in the Template page dropdown select Templates and save. Now, Curry will know who is the ancestor of page templates and will show only this page tree when applying templates to pages when a non-admin user is logged in.
By the way, the System module is also a core backend module. You can see it's class name in the address bar in the module query parameter.
Go back to the Pages module, click the Home page and set it's Base page to Templates. Once saved, you will notice that Home now inherits the Twig template attached with the Templates page. That is how you apply the layout of a template page to a "real" page. A real page is a regular page and can be accessed from the front end. Such a page can also be indexed for search purposes. If you attach modules with the Templates page, those modules will automatically be inherited by Home.
In the next chapter we will, create a page layout (aka. template page) for Demo pages.