Chapter 5.1: Construct backend modules with the ModelView framework
In this chapter we are going to construct some backend modules with the ModelView framework. Let's start with creating a module to capture a list of cities.
All project backend modules must be saved in the path cms/include/Project/Backend. Contributed packages will save their modules to the cms/include/Common folder. You don't have to strictly abide by this naming convention as long as you follow the PSR-1 naming convention for class names. The cms will search for modules in the cms/include path to list them in the backend.
Create a new file named Cities.php in the path cms/include/Project/Backend/. Open the file and type the following code:
<?php

class Project_Backend_Cities extends Curry_Backend
{
    public static function getGroup()
    {
        return 'Demo ModelView';
    }

    public function showMain()
    {

    }
}
Notice that the class name is prefixed by Project_Backend_. That's the PSR-1 way of naming classes. Now given a class name Project_Backend_Cities, Curry's autoloader function know that the class file must be found in path cms/include/Project/Backend/Cities.php.
The getGroup() method creates a group icon in the admin interface's module panel and groups backend modules returning the same group name. The default group name is Content. So if you do not specify the group name, you will find your modules showing in the Content group.
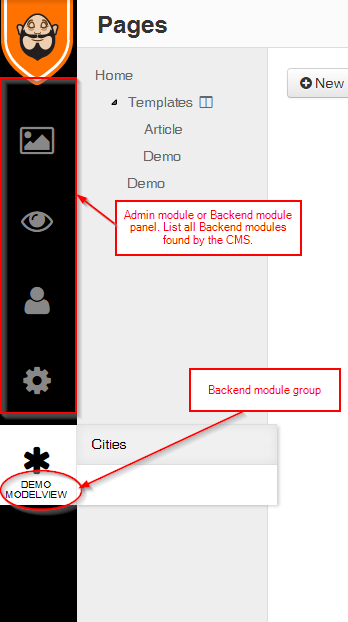
The showMain() method is the default method executed by the Cms. This method creates the main view of the module. To understand this, click the Cities link. You will see a blank page. It's blank because we have not yet written any code in the showMain method. Observe the url pattern in the address bar of the browser.
 Notice the query parameter
 module. The value of the module parameter specifies the module class. There is another parameter (not seen in the picture) named view. The value is the named of the view minus the prefix show. So in this case since there is no view parameter, the Cms assumes the default view=Main and calls the showMain method. To prove my point, create another public function named showDummyView() with this code:
public function showDummyView()
{
    echo 'Dummy view';
}
Now in the address bar set the view parameter to DummyView.
/admin.php?module=Project_Backend_Cities&view=DummyView
You should see some plain text "Dummy view" echoed to the browser. That's how Curry renders its views. You can visualize a backend module as a collection of views; one view chains to another view. To go to the next view in the chain you need some trigger mechanism which is usually a link or a button. In the ModelView framework views are rendered by making ajax requests whereas in the Flexigrid model they are rendered by making ordinary HTTP GET requests.
In the main view of the Cities module, let's show a listing of cities from the city table. You instantiate a ModelView list with $list = new Curry_ModelView_List($stringOrModelCriteria, $options). The Curry_ModelView_List constructor takes two arguments. The first one specifies the model name which is City in our case. You can also specify a ModelCriteria Propel object. This is very useful if you want to specify a customized query with virtual columns. The second argument is an array of options to configure the behaviour of the list. These options are optional. The list has defaults set. To render the list call the show() method of the list. The show method takes one argument which is the context of the backend module. That's how the list is able to "communicate" with the module.
$list = new Curry_ModelView_List('City');
$list->show($this);
Refresh the browser. You should see an empty list showing in the view.
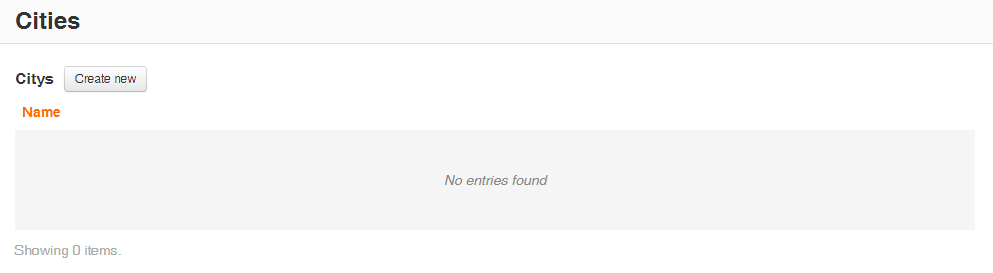
Click the Create new button showing at the top of the list. You should see a form showing. Type Stockholm and click save. Does the value get saved and show in the list? Try adding another value. Same effect? Congratulations! you have written your first backend module for Curry cms.
Wow! When you clicked the Create new button a form showing the fields from the City table showed up. When you clicked the Save button the record got saved to the correct table. You didn't have to write any code to tell Curry how to render the form or save the data. Brilliant! Was it magic? Let me shed some light here. Propel provides a smart set of APIs known as Model Introspection. We used these APIs in conjunction with Zend Form APIs to construct an intelligent form known as Curry_Form_ModelForm. If you are interested you should read the code in the core.
Components of the ModelView list
Let's look at some of the components of the list.

I will explain these components as we build other backend modules. What you need to know for now is that when you hover your mouse to the right side of each list item, you should see a cog icon showing. These are a set of actions that affect the list item that they are associated with. By default, you will see the Edit and Delete actions. They can be customized. You can hide some of them, create your own actions and even override the behavior of these default actions. For e.g. when you click Delete you will see a default confirmation message. If you don't like the text, you can customize it.
On each list item there can be one or more columns. In the Cities module there is only one column. Some of these column items may be shown as links. When you click them an action associated with the item is fired (i.e. executed). By default, the Edit action is bound to a field having the attribute primaryString="true" in the schema definition. This behavior can be customized too. You can even bind a custom action to a column of your choice.
In the next lesson, let's build a module to capture data for companies.