Chapter 4: Working with Propel schemas
Now the ground work for building a real world project has been laid. You have learnt to work with pages, create Twig templates and attach core page modules. It's now time to learn to work with schemas. Curry cms interfaces with databases through Propel.
Propel is an "Object Relation Mapping" (ORM). In the simplest sense, a database table is mapped to a Php class. The attributes of the class represent the columns of the table. Each instance of the class represents a row of data in the table. You can google to understand more on ORM or visit the Propel website.
You describe your database structure in an XML file known as a schema instead of writing raw SQL Data Definition Language (DDL) statements. You can then execute Propel either from the command line or from Curry's backend to parse the schema and generated the ORM's class files and SQL. If you execute Propel from the command line you must remember to backup your database and restore data manually every time. Curry provides a nice Auto Rebuild feature which does these things for you. Basically, Auto Rebuild performs the following steps in one request.
Steps performed by Auto Rebuild
- Backup database - Backup all tables in the database in JSON format.
- Disable backend authorization and activate Maintenance mode (
System -> System). - Rebuild - Generate or update the ORM class files in path
cms/propel/build/classes/[schema]/[om/] - Insert SQL - Generate and execute SQL (this operation clears data from the Database. Hence, doing a backup of the data is required so that it can be restored later).
- Restore - Choose appropriate backed up file to restore all backed up JSON data to database.
- Enable backend authorization and disable Maintenance mode.
Auto Rebuild backs up data to a file named backup_Y-m-d_H-i-s_autorebuild.txt in the path cms/data/backup/.
Rebuilding from the command line.
If you want to execute Propel from the command line, you need to first backup your data. You can do this from Curry's backend System -> Database -> Backup. Access the shell and go to the project's cms/propel/ directory. You should see the propel-gen shell script there. Ensure that it has executable permission. Type the following commands:
./propel-gen om
./propel-gen sql
./propel-gen insert-sql
Then go back to Curry's backend and restore your backed up data.
Sometimes, Auto Rebuild might fail. There are several reasons for this. It's hard to explain them here. Auto Rebuild always creates a backup file before it fails. This can be a life saver. You will need to disable backend authorization from System -> System -> Backend -> Disable backend authorization. Then proceed with steps 2 to 4 as described above. Don't forget to enable backend authorization after rebuilding is completed.
Migrations
You can also migrate your tables with Propel. Curry supports Propel migrations from the backend System -> Database -> Propel. On the development environment you first execute the Diff target to generate a difference file. Then execute Migrate to perform the migration. Finally, execute Rebuild. The difference file must be committed to your repository.
On the production environment, you first execute the Migrate target and then Rebuild. If you are not sure whether migrations need to be executed or not you can check the Status target. It's the same thing as ./propel-gen status.
From a terminal, on the development environment:
./propel-gen diff
./propel-gen migrate
./propel-gen om
On the production environment:
./propel-gen migrate
./propel-gen om
If your migration file creates a new table then on the production environment you will have to execute ./propel-gen instead of ./propel-gen om. You can check the status of migration by executing ./propel-gen status
Let's do some rebuilding with our demo project. We have considered a very simple model of a recycling business. We have several companies in the recycling business, each concerned with one or more recycling types like Solid Waste Services, Cardboard & Paper Recycling Services, etc. Clients make quotations which are saved into our system. A system admin will review them and send these quotations via email to concerned companies. The quotation must be sent to relevant companies residing in the same location as the client and concerned with the same recycling type as in the quote. The system admin can track which companies have viewed the quotations and when. It's the company's responsibility to service the client apart from our system.
Build the schema
As specified earlier, the schema is an XML description of our tables. You can read more about schemas in Propel's documentation. Open the file cms/propel/project.schema.xml and read its content. At the very top we specify the package name. That is a nice way to group your generated Php classes to avoid clutter. You can read more about packages here. The rest of the content describe the various tables and their relationships.
Rebuild the database by following the path System -> Database -> Propel -> Auto Rebuild. Did the rebuild succeed or fail? If it succeeded then good for you.
Auto rebuild may fail if you are working on a Virtual Machine. You may get this error file_get_contents(): php_network_getaddresses: getaddrinfo failed: Name or service not known. If it failed then follow these steps:
- Open the file
cms/config/config.php - Set the value of
noauthtotrueto disable backend authorization. Refresh the browser by placing the pointer in the address bar and hitting Enter. Don't press F5 or reload. - Follow steps 3 to 6 as described in the section Steps performed by Auto Rebuild. Please note that a backup file was already created by Auto Rebuild before it failed.
- Reset the value of
noauthtofalseand close theconfig.phpfile.
Once rebuilding is completed you should be able to see the tables in System -> Database -> Browse grouped by packages.
Sometimes, it may be wise not to use Auto Rebuild, especially if you have a lot of data in your database or used keywords in your table names such as class, comment, property, etc. These keywords conflict with Phing which is a utility used to execute propel-gen from the cms. In these cases, you must manually rebuild the database or use Propel migrations.
Manual Rebuild
- Backup your database from
System -> Database -> Backup. Save an online copy. Ensure that you backup all tables. The backup gets saved to the pathcms/data/backup/. - Disable backend authorization from
System -> System -> Backend -> Disable Backend Authorization. Select the checkbox. It may be a good idea to activate maintenance mode too if you are doing this on a production environment. - Rebuild your database. Go to
System -> Database -> Propeland selectRebuildfrom the dropdown. Click Exceute. - Generate and execute SQL. Select
Insert SQLand click Execute. Observe your tables in the left hand side panel. All data has vanished and your new changes should be visible now. You know why? - Restore backed up data from
System -> Database -> Restore. Select the file from the top of the list. The backup files are sorted in descending order of time, i.e. Latest first. Observe your tables. Data is back. - Enable backend autorization and disable maintenance mode.
TIP If you encounter errors during the rebuild process, check the console trace and try to debug.
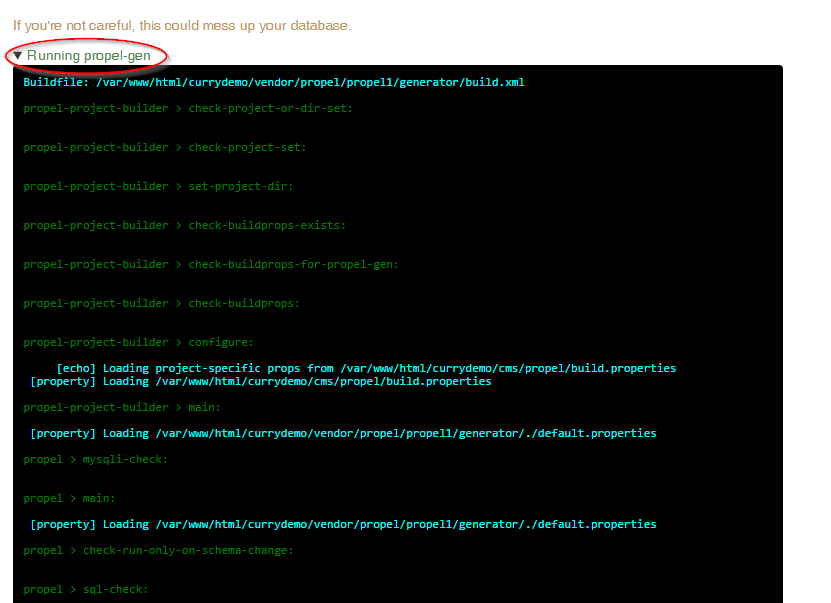
That output is identical to the output you would get had you executed propel-gen from the command line. If there are errors, they will be highlighted in red color.
That was a lot of information regarding database rebuilding in Propel. Now, let's get back to our project. We have rebuilt our database and Propel has generated all necessary class files. Maybe you should look at some of these files in path cms/propel/build/classes/project/om/. Notice that there are three types of files created for a single table.
For example, let's consider the city table. Propel created the following files: BaseCity.php, BaseCityPeer.php and BaseCityQuery.php
BaseCity.php has all methods to interact with the Active Record. You will find getters and setters for its columns. BaseCityPeer.php has methods to interact with the class as a whole. You will require this for model introspection. But, as a Curry user you can forget about it. BaseCityQuery.php has methods to interact with Propel's "query" class (i.e. ModelCriteria). You will need this class when constructing ORM queries.
Did you notice the peculiar naming convention for the files? They are prefixed with the word Base. Did you wonder why? That's because, as the name itself suggests, they form the base classes for classes that you can edit in ../City.php, ../CityPeer.php and ../CityQuery.php. Everytime, you rebuild your database, Propel will update the files in om/ folder. "om" is an abbrevation for Object Model. If a sub-class does not exist in ../ folder it is created. But once created it is not overwritten by Propel. These sub-classes are a good place for you to write some extra logic or override base features.
So far, so good. Now that we have our schema in place it's time to capture some data and fill up our tables. We do this by constructing backend modules. In the next chapter, let's create some backend modules.